Monday, December 29, 2008
Creative tools bring you the power to design - Part 1
Explore multiple design options and generate intricate graphics using robust creative features. Industry-standard drawing tools and powerful effects allow you to experiment freely and quickly achieve just the look you want.
Blob Brush tool
Create a single, clean vector shape as you sketch, even when strokes overlap. Use the Blob Brush tool together with the Eraser and Smooth tools for natural vector painting.
Eraser tool
Remove areas of artwork with the Eraser tool as easily as you erase pixels in Adobe® Photoshop® software, and enjoy complete control over the width, shape, and smoothness of the erasure.
Precise positioning
Position objects and anchor points with expert precision using the Align, Transform, and Control panels along with newly refined Smart Guides. Align to the artboard, key object, or crop area with visual feedback, thanks to on-object readouts.
Flexible brushes
Add flair to paths with customized brushes. Choose from calligraphic, scatter, art, and pattern brushes, or make your own custom brush. For tablet users, pressure sensitivity is even more subtle and controllable in Adobe Illustrator® CS4.
Smooth tool
Reduce or eliminate unwanted bumps in a path using the Smooth tool. Use together with the Blob Brush tool and the Eraser tool to sketch naturally and refine your shapes to perfection.
Live Trace
Quickly and accurately convert photos, scans, or other bitmap images to editable and scalable vector paths. Define the look of your artwork with a variety of creative options and enjoy full control over the complexity of the resulting paths.
Path editing
Remove, connect, and split paths — and convert anchor points — using options in the Control panel. Select points more easily with rollover enlargement and toggle the visibility of your curve handles.
Point alignment
Align and distribute anchor points with one click using options in the Control panel. It's as easy as aligning and distributing objects.
Pen tool
Draw with precision using the Pen tool, which provides full control over anchor points and Bezier curves.
Pencil tool
Draw onscreen as you would on paper using the Pencil tool. Smooth out paths by simply drawing a new line near the path you want to alter.
Stroke options
Define solid and dashed lines in the Stroke panel. Specify weight, miter limit, the style of joins and caps, and whether the stroke is inside, centered on, or outside the path.
Keep an eye on my blogs:
http://www.kreativsolutions.blogspot.com
http://www.kreativsolutions-indesign.blogspot.com
http://www.kreativsolutions-photoshop.blogspot.com
http://www.kreativsolutions-acrobat.blogspot.com
Facebook link:
http://www.tinyurl.com/elsontan
Tuesday, December 23, 2008
Remain proportional transformation
Monday, December 22, 2008
Finding true center point
Let's test it to see the different, click on the object to select, then just choose Edit>Copy (Command-C [PC: Control-C]), and then Edit>Paste in Front (Command-F [PC: Control-F]). From the Object menu choose Path>Average (Command-Option-J [PC: Control-Alt-J]). In the dialog, click Both for Axis. The point that appears is the true center of the object (Sample as shown below).

Keep an eye on my blogs:
http://www.kreativsolutions.blogspot.com
Facebook link:
http://www.tinyurl.com/elsontan
Thursday, December 18, 2008
Blend tool do calculation for you
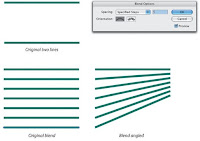
 How you can do it, just by selecting the Blend tool, click on one object, avoiding anchor points. Then, Option-click (PC: Alt-click; MAC: Option-click) on the other line. In the dialog, enter the number of new objects you want for the specified steps. Illustrator automatically will do the math calculation and evenly spaces the new objects between the two originals. (And, since the effect is live, the spacing will automatically update if you move either of the two original objects) Thus, those steps you have specified are still be editable if you wanted to increase or reduce the numbers even though you had applied, as long as all the objects have not been expanded yet. To edit the number of Blend, just by selecting the objects with Item tool (black arrow tool), then double click on Blend tool from the tool box to bring out the specified step dialogue for you to change the steps setting.
Keep an eye on my blogs:
http://www.kreativsolutions.blogspot.com
http://www.kreativsolutions-indesign.blogspot.com
http://www.kreativsolutions-illustrator.blogspot.com
http://www.kreativsolutions-photoshop.blogspot.com
http://www.kreativsolutions-acrobat.blogspot.com
http://www.tinyurl.com/elsontan
Saturday, December 13, 2008
Graphs in Illustrator
When you think about making graphs, Illustrator probably isn't your first choice. Many people don't know that Illustrator has a built-in tool that can create accurate graphs that are both interesting to look at and easy to work with. Illustrator provides a very simple-to-use spreadsheet for data entry.
Illustrator can make all of the basic graph types, including lines, stacked and grouped columns, bars, stacked bars, area graphs, pie charts, scatter graphs, and radar graphs. You can also use Illustrator to make flow charts, diagrams and maps.
To open a graph, you can click the Graph Tool icon from the tool palette. You can click and drag a space for the graph on an open window, or you can simply click on the Artboard without specifying a size for your graph.
Illustrator will open a simple spreadsheet where you can enter or import data in row-and-column format. If you're accustomed to using Excel, you'll quickly find that Illustrator lacks many of the control features you find in Excel or other spreadsheets. You won't be able to insert rows or columns, and Illustrator has no tools for creating formulas. You can create this data in Excel or another program and import it into Illustrator. You'll need to replace the formulas with their values before you import them into Illustrator.
You'll need to enclose any numerical column or row labels in double quotes; otherwise, Illustrator will assume these numbers are part of the data set. Once you've finished entering data, click the Apply button (check mark) in the upper right side of the window. Illustrator will create or update your graph. You can re-open the spreadsheet for a particular graph by double-clicking on the graph. If you add or subtract data, Illustrator will automatically update the graph to reflect the changes.
To customise your graphs, or to make changes to an existing graph display, select the graph and choose Object > Graph > Type. Illustrator will present the Graph Type dialogue box. You can change the graph type, the location of the value axis, the appearance and style of the text, and unique options that vary, depending upon the graph type you select. Graph options control such attributes as the tick values and the location of tick marks along the axes, labels, and the appearance of graph objects.
Apply any changes you've made to the graph and Illustrator will automatically update your document.
Notes for editors: Claire Blinman is the training manager at Computer Training Solutions in Bristol. Computer Training Solutions offer Creative Suite training courses or call 0800 019 6882
Wednesday, December 3, 2008
Spring-loaded feature
Enhanced typography features
Keep an eye on my blogs:
http://www.kreativsolutions.blogspot.com
http://www.kreativsolutions-indesign.blogspot.com
http://www.kreativsolutions-illustrator.blogspot.com
http://www.kreativsolutions-photoshop.blogspot.com
http://www.kreativsolutions-acrobat.blogspot.com
http://www.tinyurl.com/elsontan
Tuesday, November 25, 2008
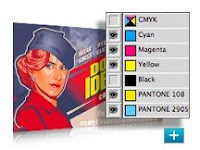
Separations Preview

Keep an eye on my blogs,
http://www.kreativsolutions.blogspot.com
http://www.kreativsolutions-indesign.blogspot.com
http://www.kreativsolutions-illustrator.blogspot.com
http://www.kreativsolutions-photoshop.blogspot.com
http://www.kreativsolutions-acrobat.blogspot.com
http://www.geocities.com/kreativbuilder
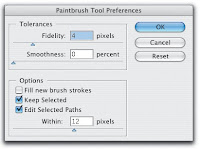
A number of tools have individual preferences or options that you can change to affect the way the tool performs. To open a tool's preferences or options, double-click any of these tools in the Toolbox: Line, Arc, Rectangular Grid, Polar Grid, Flare, Paintbrush, Pencil, Smooth, Eyedropper, Blend, Paint Bucket, Paint Selection, Measure, and any Liquify, Symbolism, or Graph tools.

Keep an eye on my blogs,
http://www.kreativsolutions.blogspot.com
http://www.kreativsolutions-indesign.blogspot.com
http://www.kreativsolutions-illustrator.blogspot.com
http://www.kreativsolutions-photoshop.blogspot.com
http://www.kreativsolutions-acrobat.blogspot.com
http://www.geocities.com/kreativbuilder
Wednesday, November 12, 2008
Enhanced gradients feature


Multiple artboards in CS4
Monday, November 3, 2008
Scalable text frame and text
In contrast, if you have selected a text frame with the Selection tool, to enlarge the font size, just to select the Scale tool (S) or Free Transform tool (E), any adjustments and dragging of the text frame certainly will scale the size of the text inside the frame. Hold shift while dragging will proportional increase the font size.
Filters vs. Effects
Show/Hide bounding box
Locking/Unlocking guides
Quick way to delete from the palette
Timing is a key factor
Switching palette's view
Other links
http://www.kreativsolutions.blogspot.com
http://www.kreativsolutions-indesign.blogspot.com
http://www.kreativsolutions-illustrator.blogspot.com
http://www.kreativsolutions-photoshop.blogspot.com
http://www.kreativsolutions-acrobat.blogspot.com
http://www.geocities.com/kreativbuilder


